
Router template routing delivers accuracy, utilizing a router bushing – a cylindrical collar – to guide the bit along a template’s edge for consistent cuts.
What are Router Guide Bushings?
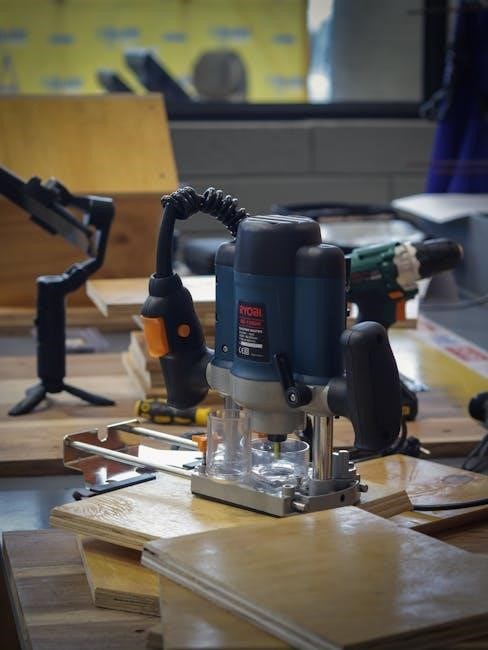
Router guide bushings are cylindrical collars that attach to your router’s baseplate, acting as a guide for the router bit. They enable precise routing along a template’s edge, offering exceptional accuracy for replicating shapes and creating consistent parts. Essentially, the bushing slides against the template, controlling the bit’s path.
These bushings unlock advanced jig and template routing possibilities, surpassing the limitations of standard flush trim or pattern bits. They are crucial for projects demanding repeatability and precision, transforming a versatile tool into a highly specialized instrument.
Why Use Router Guide Bushings?
Employing router guide bushings elevates woodworking precision, enabling the creation of multiple identical parts with consistently high accuracy. They excel when a flush trim or pattern bit falls short, offering solutions for complex curves or internal cutouts. Bushings provide an “adrenaline shot of functionality” to your router.
This method guarantees clean, professional results, especially beneficial for intricate designs or large-scale production. They’re ideal for situations demanding repeatability and control, ensuring each piece perfectly matches the template.
Types of Router Guide Bushings
Two primary bushing styles exist: Porter-Cable, utilizing a screw-on locking ring, and Bosch, which clicks into place, though adapters expand compatibility.
Porter-Cable Style Bushings
Porter-Cable style bushings are recognized by their two-piece construction, offering broad compatibility across numerous router models. These bushings secure to the router base via a screw-on locking ring, firmly holding the tubular guide in place. This design allows for easy adjustments and replacements of the guide tube itself, catering to various cutting needs.
Their widespread acceptance makes them a popular choice for woodworkers seeking versatility. Adapters are readily available to further expand their usability with different router brands, solidifying their position as a go-to option for template routing.
Bosch Style Bushings
Bosch style guide bushings distinguish themselves through a click-in installation method, designed specifically for compatibility with Bosch routers. Unlike the Porter-Cable style, they don’t require a locking ring; instead, they snap directly into a designated opening on the router base. This offers a quick and convenient setup for Bosch router owners.
However, it’s crucial to note that this style isn’t universally compatible. If you don’t own a Bosch router, you’ll need to explore adapters or subbases to utilize these bushings effectively in your woodworking projects.
Universal/Adapter Bushings
For routers lacking native compatibility with standard Porter-Cable or Bosch guide bushings, universal adapters and subbases present a versatile solution. These adapters bridge the gap, allowing you to utilize a wider range of bushings with your existing router. Subbases replace the router’s original baseplate, providing a pre-drilled opening for accepting bushings.
Investing in these components expands your routing capabilities, enabling template routing and precise duplication even with less common router models. Careful selection ensures a secure and accurate fit.

Understanding Bushing Sizes
Bushing sizes dictate the offset distance from the bit to the template edge; they’re available in both metric and imperial measurements, influencing routing precision and application.
Metric vs. Imperial Sizes
When selecting router guide bushings, understanding the difference between metric and imperial sizes is crucial for accurate template routing. Imperial bushings are measured in inches, commonly seen in older tools and American-made templates, while metric bushings utilize millimeters – prevalent in European systems.
Converting between these systems is essential when using templates from different regions. A slight mismatch can lead to inaccuracies in your finished projects. Always double-check the template’s specified bushing size and ensure compatibility with your chosen bushing set to achieve consistent, precise results.
Common Bushing Sizes and Their Applications
Several common router guide bushing sizes cater to diverse woodworking applications. A 1/2″ bushing is versatile for general-purpose routing, ideal for creating consistent edges and joinery. Smaller 3/8″ and 1/4″ bushings excel in intricate work, like box joints or delicate curves, offering greater control.
Larger bushings, such as 3/4″ or 1″, are suited for bigger projects or when offsetting the router bit further from the template. Selecting the appropriate size depends on the template design and desired cut width, ensuring optimal precision and efficiency.

Setting Up Your Router for Guide Bushing Use
Securely attach the chosen bushing to your router base, ensuring a snug fit. Proper alignment is crucial for accurate template following and clean, consistent cuts.
Attaching the Bushing to the Router Base
Two primary bushing styles exist: Porter-Cable and Bosch. Porter-Cable uses a screw-on locking ring, fitting many routers, while Bosch bushings click directly into compatible routers. If your router lacks compatibility, adapters and subbases are available.
Ensure the bushing is firmly secured to prevent wobble during operation. A loose bushing compromises accuracy. Tighten the locking ring adequately, or confirm a solid click-in connection for Bosch styles. Double-check the attachment before each use to maintain precision and safety throughout your routing process.
Ensuring Proper Alignment
Precise alignment is crucial for accurate template routing. After attaching the bushing, verify it’s perfectly centered relative to the router bit. Any misalignment introduces errors into your cuts.
Test alignment by slowly rotating the router bit and observing the gap between the bit and the bushing’s inner diameter. This gap must be consistent around the entire circumference. Minor adjustments to the bushing’s position may be needed. A properly aligned setup guarantees clean, repeatable results and prevents template damage.
Template Creation for Router Bushings
Templates, essential for guided routing, can be crafted from materials like MDF or plywood, designed for accuracy, and dictate the final shape of your workpiece.
Materials for Templates
When crafting templates for router guide bushings, material selection is crucial for accuracy and longevity. Medium-density fiberboard (MDF) stands out as a premier choice due to its stability, smooth surface, and affordability, minimizing wear on both the bushing and the template itself.
Plywood, particularly Baltic birch, offers excellent dimensional stability and resistance to warping, making it suitable for larger or more complex templates. However, plywood’s layered construction can sometimes exhibit slight imperfections.
Solid wood is generally avoided as it’s prone to expansion and contraction with humidity changes, potentially compromising accuracy. Acrylic or polycarbonate can also be used for specialized applications requiring visibility, but they may scratch more easily.
Designing Templates for Accuracy
Precise template design is paramount when employing router guide bushings. Templates should extend beyond the intended cut line by at least the bushing’s outer diameter to ensure smooth, consistent routing. Account for the bushing’s offset when drawing your design; the bit’s cutting edge will be displaced from the template edge.
Internal cutouts require careful consideration – ensure sufficient material remains to support the template during routing.
Avoid sharp internal corners, opting for generous radii to facilitate smooth bushing travel. Securely fasten the template to your workpiece to prevent shifting during operation, guaranteeing accurate results.

The Router Bushing Routing Process
Select a suitable router bit and control feed rate and depth of cut for optimal results when using guide bushings with templates.
Choosing the Right Router Bit
When employing router guide bushings, bit selection significantly impacts the final outcome. Straight bits are most common for general template work, ensuring clean edges. Spiral bits excel at plunge cuts and creating smooth curves, though they can generate more heat.
Consider the material being routed; harder woods benefit from bits with sharper angles and durable coatings. The bit’s shank size must match your router’s collet. Furthermore, the bit’s cutting depth should align with the template thickness and desired final product dimensions for precise results. Always prioritize quality bits for accuracy and safety.
Feed Rate and Depth of Cut
Controlling feed rate and depth of cut is crucial when using router guide bushings. A slower, consistent feed rate prevents tear-out and ensures a smooth finish, especially with hardwoods. Multiple shallow passes are preferable to a single deep cut, minimizing stress on the bit and router.
Adjust the router’s depth of cut incrementally, typically no more than half the bit’s diameter per pass. This approach maintains control and accuracy while reducing the risk of overheating or damaging the template. Monitor the router’s performance and adjust accordingly.

Advanced Techniques with Router Guide Bushings
Guide bushings unlock offset routing, nested templates, and multi-bushing setups, expanding routing possibilities beyond simple edge following for complex projects.
Offset Routing
Offset routing leverages the space between the router bit and the guide bushing’s inner diameter to create cuts parallel to a template edge; This technique is invaluable when you need to replicate a shape with a specific wall thickness or create grooves at a precise distance. By selecting a bushing with the appropriate offset, you can consistently produce identical parts without recalculating measurements for each cut. It’s a powerful method for creating joinery, inlays, or decorative elements, offering both precision and efficiency in your woodworking projects. Mastering offset routing expands your design capabilities significantly.
Nested Templates
Nested templates maximize material efficiency when producing multiple identical parts. This involves arranging the outlines of your desired shapes closely together on a single template sheet. Using a router and guide bushing, you can then cut out all the parts in a single pass, minimizing waste. This technique is particularly useful for smaller components or intricate designs. Careful planning of the template layout is crucial to ensure clean separation of the parts during routing, optimizing both time and resources for your woodworking endeavors.
Using Multiple Bushings
Employing multiple guide bushings expands routing capabilities, allowing for complex operations like creating mortises or dadoes. By switching between different sized bushings, you can achieve varying offsets from the template edge in a single setup. This eliminates the need for repeated template adjustments, enhancing precision and workflow. Strategically selecting bushing sizes and carefully designing templates are key to successful multi-bushing routing, unlocking intricate joinery and design possibilities within your woodworking projects.

Guide Bushing Materials
Guide bushings come in metal (steel, brass) for durability, and plastic for reduced friction; material choice impacts smoothness and template interaction during routing.
Metal Bushings (Steel, Brass)
Metal bushings, typically crafted from steel or brass, represent a durable and precise option for template routing. Steel bushings offer exceptional longevity and resistance to wear, making them ideal for frequent or demanding applications. Brass bushings, while softer than steel, provide reduced friction against the template surface, potentially resulting in smoother cuts and minimizing template damage.
The added weight of metal bushings can also contribute to stability during operation. However, it’s crucial to ensure the template material can withstand the bushing’s weight without shifting or distorting. Regularly inspecting metal bushings for any signs of damage, like cracks or deformation, is essential for maintaining accuracy and safety.
Plastic Bushings
Plastic bushings present a lightweight and cost-effective alternative to their metal counterparts, particularly suitable for softer template materials like melamine or acrylic. Their reduced weight minimizes the risk of template slippage during routing, enhancing accuracy, especially with larger templates. However, plastic bushings generally exhibit lower durability compared to steel or brass.
They are more susceptible to wear and tear, potentially losing their precise circular shape over time. Frequent use can lead to deformation, impacting the quality of cuts. Regularly checking for wear and replacing plastic bushings as needed is vital for maintaining consistent results.

Maintaining Your Router Guide Bushings
Regular cleaning and lubrication are crucial for optimal performance; inspect bushings frequently for wear, ensuring consistent, accurate routing and extending their lifespan effectively.
Cleaning and Lubrication
Maintaining your router guide bushings involves regular cleaning to remove accumulated sawdust and debris, which can impede smooth operation and affect accuracy. After each use, thoroughly wipe down the bushing with a clean, dry cloth. For stubborn residue, a soft brush or compressed air can be employed.
Lubrication is equally important; apply a small amount of lubricant – such as silicone spray or a specialized bushing lubricant – to the bushing’s inner surface. This reduces friction and ensures a consistently smooth glide along the template. Avoid oil-based lubricants, as they can attract dust. Proper cleaning and lubrication significantly extend the life and performance of your guide bushings.
Inspecting for Wear and Tear
Regularly inspect your router guide bushings for any signs of wear or damage. Look closely at the inner and outer surfaces for scratches, dents, or deformation. Any imperfections can compromise the bushing’s ability to guide the router accurately, leading to inconsistent cuts.
Check the locking mechanism – whether it’s a screw-on ring or a click-in system – to ensure it’s functioning correctly and securely holds the bushing in place. Replace any bushings exhibiting significant wear, as attempting to use damaged bushings can negatively impact project quality and safety.
Troubleshooting Common Issues
Common problems include bushing wobble and template slippage; ensure a secure bushing lock and template adhesion for accurate routing and consistent results.
Bushing Wobble
Bushing wobble significantly impacts routing accuracy, creating uneven cuts and deviating from the intended template path. Several factors contribute to this issue, including a loose bushing within the router base or a damaged bushing itself. First, verify the bushing is securely fastened; tighten the locking ring or ensure a proper click-in fit.
Inspect the bushing for any visible damage, like cracks or deformation. Also, check the router base for debris or inconsistencies preventing a snug fit. If wobble persists, consider using a different bushing or exploring adapter options for improved stability and precision during your routing operations.
Template Slippage
Template slippage is a common frustration when using router guide bushings, leading to inaccurate cuts and inconsistent results. To prevent this, securely fasten the template to your workpiece using double-sided tape, clamps, or screws – ensuring it remains immobile during routing.
Consider the template material; slick surfaces increase slippage risk. A slightly textured material offers better grip. Regularly check the template’s position throughout the routing process, and avoid excessive feed rates that can exacerbate movement. Proper template adhesion is crucial for precision.
Router Guide Bushings vs. Pattern Bits
Guide bushings and pattern bits both enable template routing, but bushings offer versatility with offset capabilities, while bits rely on bearing contact.
Comparing the Two Methods
Pattern bits utilize a bearing that follows the template’s edge, directly controlling the cut; this is ideal for flush trimming. However, router guide bushings provide greater flexibility. They mount to the router base and allow for offset routing, creating parts larger or smaller than the template.
Bushings excel when you need consistent spacing or multiple passes, while pattern bits are simpler for direct edge following. Choosing depends on the project’s complexity and desired outcome – bushings unlock advanced jigging possibilities.
When to Use Each Technique
Employ pattern bits for straightforward tasks like flush-trimming edges or replicating a template’s exact shape. When precision and repeatability are paramount, especially for multiple identical parts, router guide bushings shine. They’re invaluable for creating inlays, joinery, or offset patterns.
If a project demands offset cuts or complex template work, bushings are the superior choice. For simple edge refinement, a pattern bit offers convenience. Consider the project’s geometry and desired level of control when deciding.

Safety Precautions When Using Router Guide Bushings
Always wear eye and ear protection during operation. Effective dust collection is crucial for a safe and healthy workspace when routing with bushings.
Eye and Ear Protection
Routing generates significant noise and produces flying debris, making robust personal protective equipment essential. Always wear safety glasses or a face shield to shield your eyes from wood chips and dust particles ejected at high velocity.
Furthermore, the high-pitched whine of a router can cause lasting hearing damage; therefore, consistently use earplugs or earmuffs with a sufficient noise reduction rating. Prioritizing these safety measures ensures a comfortable and secure routing experience, preventing potential injuries and safeguarding your long-term health.
Dust Collection
Routing creates substantial amounts of fine dust, posing respiratory hazards and reducing visibility. Connecting your router to a dust collection system, such as a shop vacuum, is highly recommended. This minimizes airborne particles, improving air quality and preventing dust buildup in your workspace.
Effective dust collection also enhances the routing process by maintaining a clear view of the cutting area and preventing the dust from interfering with the guide bushing and template.

Adapters and Subbases for Router Compatibility
If your router lacks compatibility with standard guide bushings, adapters and subbases offer solutions, expanding your routing capabilities and precision.
Finding the Right Adapter
Determining the correct adapter requires knowing your router’s baseplate dimensions and the bushing style needed – Porter-Cable or Bosch. Universal adapters exist, but ensure a secure fit.
Carefully measure the diameter of your router’s baseplate opening and compare it to adapter specifications. Consider the material of the adapter; metal offers durability.
Read reviews to assess adapter quality and stability. A poorly fitting adapter can introduce wobble, compromising accuracy. Prioritize adapters designed specifically for guide bushing use, guaranteeing precision and safety during operation.
Installing a Subbase
A subbase replaces your router’s original baseplate, providing compatibility with guide bushings. Begin by disconnecting the router from power and removing the existing baseplate.
Align the new subbase with the mounting holes, ensuring a flush fit. Secure it using the appropriate screws, tightening them evenly to prevent warping.
Verify the subbase is firmly attached and doesn’t wobble. A stable subbase is crucial for accurate template routing. Double-check compatibility with your chosen bushings before proceeding with any routing operations.
Resources for Further Learning
Explore online forums and communities, alongside books and videos, to deepen your router technique mastery and unlock the full potential of guide bushings.
Online Forums and Communities
Engage with fellow woodworkers in online forums dedicated to woodworking and routing techniques; these platforms offer invaluable opportunities to learn from experienced users. Share your projects, ask specific questions about router guide bushings, and benefit from collective problem-solving. Websites like Woodworking Talk and Reddit’s r/woodworking frequently host discussions on template routing and bushing setups.
These communities are excellent resources for troubleshooting issues, discovering advanced techniques, and staying updated on the latest tools and accessories related to router guide bushing applications.
Books and Videos on Router Techniques
Numerous books and video tutorials comprehensively cover router techniques, including the effective use of guide bushings. Look for resources specifically addressing template routing and jig creation. Popular authors and instructors offer detailed guidance on bushing selection, template design, and proper setup procedures.
YouTube channels dedicated to woodworking often feature demonstrations of router guide bushing applications, providing visual learning experiences. These resources can significantly enhance your understanding and skill development.